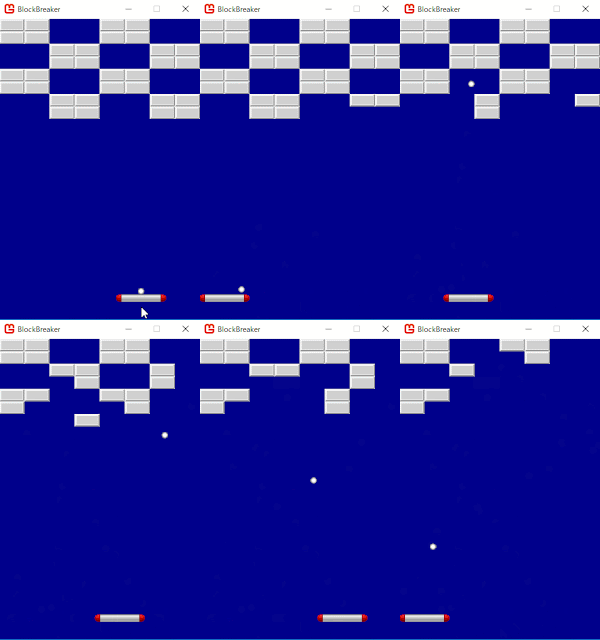
MonoGameでブロック崩しを作ってみようと思います。
ブロック崩しは、やたらとプログラミング初心者が作りたがる題材な気がします。または、やたらと、上級者が初心者に作らせたがる題材な気がします。しかし、ガチで作ると、結構難しい題材なんじゃないかと私は思うのです。雑な、なんとなくそれっぽいものでOKなら簡単に作れるのですが、ちゃんと遊べるブロック崩しを作るのは結構難しくて、初心者向きとは言えないような気がするのですが…まあ作ってみたいと思います。
ブロック崩しの歴史
1976年にATARIという会社がBreakoutというゲームを生み出しました。
全てのブロック崩しゲームの源流となるゲームです。歴史的なヒット作ですが、ぶっちゃけ、当時としては斬新だったからヒットしたのであって、今やったら全然面白くないと思います…やったことないですが、動画見る限りは。
それから10年が経過した1986年、タイトーがブロック崩しを大幅に進化させたアルカノイドというゲームをリリースしました。
アイテムや敵などのシステム面、レベルデザイン、グラフィックなど、あらゆる面で作り込まれており、ブロック崩しゲームはこのアルカノイドで完成されたと言って良いでしょう。アルカノイドは、今やっても十分遊べるゲームです。
アルカノイド以降もたくさんのブロック崩しゲームが登場しましたが、結局、歴史に名を残したのは、元祖のBreakoutとアルカノイドだけでした。
すみません、前置きが長くなりました。作りましょう。
リソースファイルのダウンロード
ここから画像や音のリソースをダウンロードし、zipファイルを解凍しておいてください。
プロジェクトの作成
Visual Studioから、新規プロジェクト(MonoGame Windows Project)を作成します。
本記事では「BlockBreaker」という名前で作っています。
プロジェクトを作成したら、MonoGame Pipeline Toolを開き、先程ダウンロードしたリソースを追加してビルドします。
ウィンドウサイズの変更
ブロック崩しには縦長の画面が似合うので、まずはウィンドウサイズを変更しましょう。
あと、マウスでバー(ラケット)を操作しようと思うので、マウスを表示しておきます。
using Microsoft.Xna.Framework;
using Microsoft.Xna.Framework.Graphics;
using Microsoft.Xna.Framework.Input;
namespace BlockBreaker
{
public class Game1 : Game
{
static readonly int WindowWidth = 320; // ウィンドウの幅
static readonly int WindowHeight = 480; // ウィンドウの高さ
GraphicsDeviceManager graphics;
SpriteBatch spriteBatch;
public Game1()
{
graphics = new GraphicsDeviceManager(this);
Content.RootDirectory = "Content";
// ウィンドウサイズ変更
graphics.PreferredBackBufferWidth = WindowWidth;
graphics.PreferredBackBufferHeight = WindowHeight;
graphics.ApplyChanges();
// マウスを表示する
IsMouseVisible = true;
}
protected override void Initialize()
{
base.Initialize();
}
protected override void LoadContent()
{
spriteBatch = new SpriteBatch(GraphicsDevice);
}
protected override void UnloadContent()
{
}
protected override void Update(GameTime gameTime)
{
if (GamePad.GetState(PlayerIndex.One).Buttons.Back == ButtonState.Pressed || Keyboard.GetState().IsKeyDown(Keys.Escape))
Exit();
base.Update(gameTime);
}
protected override void Draw(GameTime gameTime)
{
GraphicsDevice.Clear(Color.CornflowerBlue);
base.Draw(gameTime);
}
}
}

画像の読み込み
ゲームに使う画像を読み込む処理を書きましょう。
using Microsoft.Xna.Framework;
using Microsoft.Xna.Framework.Graphics;
using Microsoft.Xna.Framework.Input;
namespace BlockBreaker
{
public class Game1 : Game
{
static readonly int WindowWidth = 320; // ウィンドウの幅
static readonly int WindowHeight = 480; // ウィンドウの高さ
GraphicsDeviceManager graphics;
SpriteBatch spriteBatch;
Texture2D textureBar; // バーの画像
Texture2D textureBall; // ボールの画像
Texture2D textureBlock; // ブロックの画像
public Game1()
{
graphics = new GraphicsDeviceManager(this);
Content.RootDirectory = "Content";
// ウィンドウサイズ変更
graphics.PreferredBackBufferWidth = WindowWidth;
graphics.PreferredBackBufferHeight = WindowHeight;
graphics.ApplyChanges();
// マウスを表示する
IsMouseVisible = true;
}
protected override void Initialize()
{
base.Initialize();
}
protected override void LoadContent()
{
spriteBatch = new SpriteBatch(GraphicsDevice);
// テクスチャーの読み込み
textureBar = Content.Load<Texture2D>("bar");
textureBall = Content.Load<Texture2D>("ball");
textureBlock = Content.Load<Texture2D>("block");
}
protected override void UnloadContent()
{
}
protected override void Update(GameTime gameTime)
{
if (GamePad.GetState(PlayerIndex.One).Buttons.Back == ButtonState.Pressed || Keyboard.GetState().IsKeyDown(Keys.Escape))
Exit();
base.Update(gameTime);
}
protected override void Draw(GameTime gameTime)
{
GraphicsDevice.Clear(Color.CornflowerBlue);
base.Draw(gameTime);
}
}
}
ボールの作成
ブロック崩しの主な登場人物は3つ。ボール、ブロック、バーです。ここはやはりボールから作りましょうか。
using Microsoft.Xna.Framework;今回はボールの画像が10×10ピクセルなので、定数BallWidthとBallHeightでそのように定義しました。
using Microsoft.Xna.Framework.Graphics;
using Microsoft.Xna.Framework.Input;
namespace BlockBreaker
{
public class Game1 : Game
{
static readonly int WindowWidth = 320; // ウィンドウの幅
static readonly int WindowHeight = 480; // ウィンドウの高さ
static readonly int BallWidth = 10; // ボールの幅
static readonly int BallHeight = 10; // ボールの高さ
GraphicsDeviceManager graphics;
SpriteBatch spriteBatch;
Texture2D textureBar; // バーの画像
Texture2D textureBall; // ボールの画像
Texture2D textureBlock; // ブロックの画像
Vector2 ballVelocity = new Vector2(3, -3); // ボールの速度
Vector2 ballPosition = new Vector2(160, 400); // ボールの位置(左上の座標)
public Game1()
{
graphics = new GraphicsDeviceManager(this);
Content.RootDirectory = "Content";
// ウィンドウサイズ変更
graphics.PreferredBackBufferWidth = WindowWidth;
graphics.PreferredBackBufferHeight = WindowHeight;
graphics.ApplyChanges();
// マウスを表示する
IsMouseVisible = true;
}
protected override void Initialize()
{
base.Initialize();
}
protected override void LoadContent()
{
spriteBatch = new SpriteBatch(GraphicsDevice);
// テクスチャーの読み込み
textureBar = Content.Load<Texture2D>("bar");
textureBall = Content.Load<Texture2D>("ball");
textureBlock = Content.Load<Texture2D>("block");
}
protected override void UnloadContent()
{
}
protected override void Update(GameTime gameTime)
{
if (GamePad.GetState(PlayerIndex.One).Buttons.Back == ButtonState.Pressed || Keyboard.GetState().IsKeyDown(Keys.Escape))
Exit();
// ボールを速度の分だけ移動させる
ballPosition += ballVelocity;
base.Update(gameTime);
}
protected override void Draw(GameTime gameTime)
{
GraphicsDevice.Clear(Color.CornflowerBlue);
// SpriteBatchで描画するために必要
spriteBatch.Begin();
// ボールの描画
spriteBatch.Draw(textureBall, ballPosition, Color.White);
// SpriteBatchで描画するために必要
spriteBatch.End();
base.Draw(gameTime);
}
}
}
ボールのために必要な変数は2つです。移動速度ballVelocityと位置ballPositionです。
ballVelocityは1フレームごとに移動するピクセル数を表します。
ballPositionは現在のボールの位置です。厳密に言うと、ボールの左上の座標です。
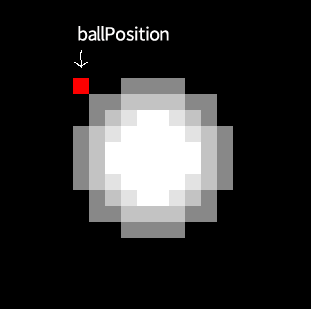
ブロックや壁との衝突を判定する際は、これを強く意識する必要があります。気を付けてください。
MonoGameは画面の左上が原点なので、必然的に左上を基準に作ることが多くなりますが、どの部分を基準点にするのかは、開発環境やゲームジャンルによって異なります。例えば、弾幕シューティングゲームみたいなのであれば、画像の中心を基準にしたほうが作りやすいでしょう。

プログラムを実行すると、ボールが出現し、右上に向かって進みます。ballVelocityの初期値を変更して、色々な角度に飛ばしてみてください。
壁との衝突判定
さて、現状では、すぐにボールが画面外に飛び出していってしまうので、壁とぶつかったら跳ね返るようにしてみましょう。
protected override void Update(GameTime gameTime)
{
if (GamePad.GetState(PlayerIndex.One).Buttons.Back == ButtonState.Pressed || Keyboard.GetState().IsKeyDown(Keys.Escape))
Exit();
// ボールを速度の分だけ移動させる
ballPosition += ballVelocity;
// ボールの左端が左の壁にめり込んでいる、
// または
// ボールの右端が右の壁にめり込んでいる場合
if (ballPosition.X < 0 || ballPosition.X + BallWidth >= WindowWidth)
{
// 移動速度の左右を反転させる
ballVelocity.X *= -1;
}
// ボールの上端が上の壁にめり込んでいる、
// または
// ボールの下端が下の壁にめり込んでいる場合
if (ballPosition.Y < 0 || ballPosition.Y + BallHeight >= WindowHeight)
{
// 移動速度の上下を反転させる
ballVelocity.Y *= -1;
}
base.Update(gameTime);
}

ボールが壁で跳ね返ります。なんか、これだけでも見ていて楽しくないですか?
やっぱりブロック崩しは初心者にオススメな題材な気がしてきました(笑)
はい。本山は気が変わりやすいです。
あ、画面の下端で跳ね返る処理は仮です。最終的には、ボールが画面の下端に到達したらゲームオーバーとします。
バーの作成
ボールを打ち返すバーを作りましょう。バーはマウスで動かしたいと思います。
using Microsoft.Xna.Framework;マウスに合わせてバーが動きます。
using Microsoft.Xna.Framework.Graphics;
using Microsoft.Xna.Framework.Input;
namespace BlockBreaker
{
public class Game1 : Game
{
static readonly int WindowWidth = 320; // ウィンドウの幅
static readonly int WindowHeight = 480; // ウィンドウの高さ
static readonly int BallWidth = 10; // ボールの幅
static readonly int BallHeight = 10; // ボールの高さ
static readonly int BarWidth = 80; // バーの幅
static readonly int BarPositionY = 440; // バーのy座標(上端)
GraphicsDeviceManager graphics;
SpriteBatch spriteBatch;
Texture2D textureBar; // バーの画像
Texture2D textureBall; // ボールの画像
Texture2D textureBlock; // ブロックの画像
Vector2 ballVelocity = new Vector2(3, -3); // ボールの速度
Vector2 ballPosition = new Vector2(160, 400); // ボールの位置(左上の座標)
int barPositionX = 160; // バーのx座標(左端)
public Game1()
{
graphics = new GraphicsDeviceManager(this);
Content.RootDirectory = "Content";
// ウィンドウサイズ変更
graphics.PreferredBackBufferWidth = WindowWidth;
graphics.PreferredBackBufferHeight = WindowHeight;
graphics.ApplyChanges();
// マウスを表示する
IsMouseVisible = true;
}
protected override void Initialize()
{
base.Initialize();
}
protected override void LoadContent()
{
spriteBatch = new SpriteBatch(GraphicsDevice);
// テクスチャーの読み込み
textureBar = Content.Load<Texture2D>("bar");
textureBall = Content.Load<Texture2D>("ball");
textureBlock = Content.Load<Texture2D>("block");
}
protected override void UnloadContent()
{
}
protected override void Update(GameTime gameTime)
{
if (GamePad.GetState(PlayerIndex.One).Buttons.Back == ButtonState.Pressed || Keyboard.GetState().IsKeyDown(Keys.Escape))
Exit();
// バーの移動処理
barPositionX = Mouse.GetState().X - BarWidth / 2;
// 画面からはみ出ないように制限
if (barPositionX < 0)
barPositionX = 0;
if (barPositionX > WindowWidth - BarWidth)
barPositionX = WindowWidth - BarWidth;
// ボールを速度の分だけ移動させる
ballPosition += ballVelocity;
// ボールの左端が左の壁にめり込んでいる、
// または
// ボールの右端が右の壁にめり込んでいる場合
if (ballPosition.X < 0 || ballPosition.X + BallWidth >= WindowWidth)
{
// 移動速度の左右を反転させる
ballVelocity.X *= -1;
}
// ボールの上端が上の壁にめり込んでいる、
// または
// ボールの下端が下の壁にめり込んでいる場合
if (ballPosition.Y < 0 || ballPosition.Y + BallHeight >= WindowHeight)
{
// 移動速度の上下を反転させる
ballVelocity.Y *= -1;
}
base.Update(gameTime);
}
protected override void Draw(GameTime gameTime)
{
GraphicsDevice.Clear(Color.CornflowerBlue);
// SpriteBatchで描画するために必要
spriteBatch.Begin();
// バーの描画
spriteBatch.Draw(textureBar, new Vector2(barPositionX, BarPositionY), Color.White);
// ボールの描画
spriteBatch.Draw(textureBall, ballPosition, Color.White);
// SpriteBatchで描画するために必要
spriteBatch.End();
base.Draw(gameTime);
}
}
}

バーがウィンドウの外に飛び出さないようにする処理は次の箇所です。
// 画面からはみ出ないように制限上記でも良いのですが、次のように書くと、より素敵です。
if (barPositionX < 0)
barPositionX = 0;
if (barPositionX > WindowWidth - BarWidth)
barPositionX = WindowWidth - BarWidth;
// 画面からはみ出ないように制限効果は全く同じです。
barPositionX = MathHelper.Clamp(barPositionX, 0, WindowWidth - BarWidth);
Clampというのは、値を指定の範囲に収める関数です。引数は、元の値、最小値、最大値です。今回のようなケースでよく使います。プログラムの行数が4分の1になるし、慣れている人が見れば「Clampを使っているということは、値をある範囲に制限したいんだな」というのがひと目で分かるので、良いです。
さて、続いてボールとバーの衝突判定を作ります。ボールとバーの衝突を検出するのは、それほど難しくありません。今回はボールも四角形とみなして作っているので、ボールとバーが衝突しているかは、四角形と四角形が重なっているかを調べればわかります。
AとBという四角形がある場合、2つが重なっている条件は以下の通りです。
- A右端がB左端より右
- A左端がB右端より左
- A上端がB下端より上
- A下端がB上端より下
これを全て満たす場合、四角形は重なっています。一つでも該当しない場合は重なっていません。
この手法で判定してみましょう。

今回、バーの高さを1として判定しています(高さ1ピクセルの四角形、つまり線分みたいなものですね)。何故かというと、バーを素直に見た目通りの四角形として衝突判定すると、次の図のように、ボールが横からぶつかったときにも上に跳ね返してしまって、気持ち悪いからです。

こういう状況ではスルーするために、バーの当たり判定は縦1ピクセルにしました。
以下の部分で、何故、ボールが下向きに飛んでいるかを調べているかというと、

ボールが上向きに動いている時は何もしない、去る者は追わないようにすればOKです。
さて、これでボールとバーの衝突判定は完成でしょうか?
残念ながらNOです。
世の初心者向けのブロック崩しチュートリアルのほとんどは、これで良しとしていますが、このままではクソゲーです。
現状、ボールは常に同じ角度で動き続けます。プレイヤーがどのようにバーを動かしても、ボールには何の影響も与えられません。はたしてこれでゲームと言えるのでしょうか?
ボールが徐々に速くなっていけば、反射神経を競うゲームとしてはアリかもしれませんが、ただそれだけです。技術も戦略性も何もない、ただの反射神経ゲームです。
では、市販のブロック崩しはどうしているのでしょうか?
大きく分けて二通りが存在します。
まず、アルカノイドタイプ。
ボールの入射角に関係なく、バーのどこで打ち返したかによって、反射角が決まります。中央で打ち返すと真上に跳ね返ります。左側で打ち返すと左側に飛び、右側で打ち返すと右側に飛びます。

物理的にはおかしいのですが、遊んでいて楽しいのでOKです。上達すると、狙った通りの場所に打ち返すことが可能となります。
別のパターンとして、跳ね返す瞬間にバーを移動させていると、移動している方向に角度が傾くという方式があります。

この方式は、それほど狙い通りの場所には打ち返せないのと、マウスとの相性が良くない(マウスの移動速度は無限大のため)ので、今回はアルカノイドタイプでいきます。
ボールをバーで跳ね返す部分のコードを書き換えます。
これによりプレイヤーは、ゲームの世界に影響を与えられる悦びと、プレイが上達する悦びを得られます。
この手法で判定してみましょう。
using Microsoft.Xna.Framework;バーでボールを打ち返せるようになりました!
using Microsoft.Xna.Framework.Graphics;
using Microsoft.Xna.Framework.Input;
namespace BlockBreaker
{
public class Game1 : Game
{
static readonly int WindowWidth = 320; // ウィンドウの幅
static readonly int WindowHeight = 480; // ウィンドウの高さ
static readonly int BallWidth = 10; // ボールの幅
static readonly int BallHeight = 10; // ボールの高さ
static readonly int BarWidth = 80; // バーの幅
static readonly int BarPositionY = 440; // バーのy座標(上端)
GraphicsDeviceManager graphics;
SpriteBatch spriteBatch;
Texture2D textureBar; // バーの画像
Texture2D textureBall; // ボールの画像
Texture2D textureBlock; // ブロックの画像
Vector2 ballVelocity = new Vector2(3, -3); // ボールの速度
Vector2 ballPosition = new Vector2(160, 400); // ボールの位置(左上の座標)
int barPositionX = 160; // バーのx座標(左端)
public Game1()
{
graphics = new GraphicsDeviceManager(this);
Content.RootDirectory = "Content";
// ウィンドウサイズ変更
graphics.PreferredBackBufferWidth = WindowWidth;
graphics.PreferredBackBufferHeight = WindowHeight;
graphics.ApplyChanges();
// マウスを表示する
IsMouseVisible = true;
}
protected override void Initialize()
{
base.Initialize();
}
protected override void LoadContent()
{
spriteBatch = new SpriteBatch(GraphicsDevice);
// テクスチャーの読み込み
textureBar = Content.Load<Texture2D>("bar");
textureBall = Content.Load<Texture2D>("ball");
textureBlock = Content.Load<Texture2D>("block");
}
protected override void UnloadContent()
{
}
protected override void Update(GameTime gameTime)
{
if (GamePad.GetState(PlayerIndex.One).Buttons.Back == ButtonState.Pressed || Keyboard.GetState().IsKeyDown(Keys.Escape))
Exit();
// バーの移動処理
barPositionX = Mouse.GetState().X - BarWidth / 2;
// 画面からはみ出ないように制限
barPositionX = MathHelper.Clamp(barPositionX, 0, WindowWidth - BarWidth);
// ボールを速度の分だけ移動させる
ballPosition += ballVelocity;
// ボールが下向きに飛んできて、バーが接触していたら、跳ね返す
if (ballVelocity.Y > 0 && BallIntersectsBar())
{
// 移動速度の上下を反転させる
ballVelocity.Y *= -1;
}
// ボールの左端が左の壁にめり込んでいる、
// または
// ボールの右端が右の壁にめり込んでいる場合
if (ballPosition.X < 0 || ballPosition.X + BallWidth >= WindowWidth)
{
// 移動速度の左右を反転させる
ballVelocity.X *= -1;
}
// ボールの上端が上の壁にめり込んでいる、
// または
// ボールの下端が下の壁にめり込んでいる場合
if (ballPosition.Y < 0 || ballPosition.Y + BallHeight >= WindowHeight)
{
// 移動速度の上下を反転させる
ballVelocity.Y *= -1;
}
base.Update(gameTime);
}
// ボールとバーが接触しているか?
bool BallIntersectsBar()
{
float ballLeft = ballPosition.X;
float ballRight = ballPosition.X + BallWidth;
float ballTop = ballPosition.Y;
float ballBottom = ballPosition.Y + BallHeight;
float barLeft = barPositionX;
float barRight = barPositionX + BarWidth;
float barTop = BarPositionY;
float barBottom = BarPositionY + 1;
return ballLeft < barRight && ballRight > barLeft && ballTop < barBottom && ballBottom > barTop;
}
protected override void Draw(GameTime gameTime)
{
GraphicsDevice.Clear(Color.CornflowerBlue);
// SpriteBatchで描画するために必要
spriteBatch.Begin();
// バーの描画
spriteBatch.Draw(textureBar, new Vector2(barPositionX, BarPositionY), Color.White);
// ボールの描画
spriteBatch.Draw(textureBall, ballPosition, Color.White);
// SpriteBatchで描画するために必要
spriteBatch.End();
base.Draw(gameTime);
}
}
}

今回、バーの高さを1として判定しています(高さ1ピクセルの四角形、つまり線分みたいなものですね)。何故かというと、バーを素直に見た目通りの四角形として衝突判定すると、次の図のように、ボールが横からぶつかったときにも上に跳ね返してしまって、気持ち悪いからです。

こういう状況ではスルーするために、バーの当たり判定は縦1ピクセルにしました。
以下の部分で、何故、ボールが下向きに飛んでいるかを調べているかというと、
// ボールが下向きに飛んできて、バーが接触していたら、跳ね返すこの判定を入れないと、ボールが横から入ってきた時に、ボールが大変な動きをしてしまいます。判定を消してみればわかります。
if (ballVelocity.Y > 0 && BallIntersectsBar())
{
// 移動速度の上下を反転させる
ballVelocity.Y *= -1;
}

ボールが上向きに動いている時は何もしない、去る者は追わないようにすればOKです。
さて、これでボールとバーの衝突判定は完成でしょうか?
残念ながらNOです。
世の初心者向けのブロック崩しチュートリアルのほとんどは、これで良しとしていますが、このままではクソゲーです。
現状、ボールは常に同じ角度で動き続けます。プレイヤーがどのようにバーを動かしても、ボールには何の影響も与えられません。はたしてこれでゲームと言えるのでしょうか?
ボールが徐々に速くなっていけば、反射神経を競うゲームとしてはアリかもしれませんが、ただそれだけです。技術も戦略性も何もない、ただの反射神経ゲームです。
では、市販のブロック崩しはどうしているのでしょうか?
大きく分けて二通りが存在します。
まず、アルカノイドタイプ。
ボールの入射角に関係なく、バーのどこで打ち返したかによって、反射角が決まります。中央で打ち返すと真上に跳ね返ります。左側で打ち返すと左側に飛び、右側で打ち返すと右側に飛びます。

物理的にはおかしいのですが、遊んでいて楽しいのでOKです。上達すると、狙った通りの場所に打ち返すことが可能となります。
別のパターンとして、跳ね返す瞬間にバーを移動させていると、移動している方向に角度が傾くという方式があります。

この方式は、それほど狙い通りの場所には打ち返せないのと、マウスとの相性が良くない(マウスの移動速度は無限大のため)ので、今回はアルカノイドタイプでいきます。
ボールをバーで跳ね返す部分のコードを書き換えます。
using Microsoft.Xna.Framework;狙った方向にボールを打ち返せるようになりました。
using Microsoft.Xna.Framework.Graphics;
using Microsoft.Xna.Framework.Input;
using System; // Mathを使うのに必要
namespace BlockBreaker
{
public class Game1 : Game
{
static readonly int WindowWidth = 320; // ウィンドウの幅
static readonly int WindowHeight = 480; // ウィンドウの高さ
static readonly int BallWidth = 10; // ボールの幅
static readonly int BallHeight = 10; // ボールの高さ
static readonly int BarWidth = 80; // バーの幅
static readonly int BarPositionY = 440; // バーのy座標(上端)
GraphicsDeviceManager graphics;
SpriteBatch spriteBatch;
Texture2D textureBar; // バーの画像
Texture2D textureBall; // ボールの画像
Texture2D textureBlock; // ブロックの画像
Vector2 ballVelocity = new Vector2(3, -3); // ボールの速度
Vector2 ballPosition = new Vector2(160, 400); // ボールの位置(左上の座標)
int barPositionX = 160; // バーのx座標(左端)
public Game1()
{
graphics = new GraphicsDeviceManager(this);
Content.RootDirectory = "Content";
// ウィンドウサイズ変更
graphics.PreferredBackBufferWidth = WindowWidth;
graphics.PreferredBackBufferHeight = WindowHeight;
graphics.ApplyChanges();
// マウスを表示する
IsMouseVisible = true;
}
protected override void Initialize()
{
base.Initialize();
}
protected override void LoadContent()
{
spriteBatch = new SpriteBatch(GraphicsDevice);
// テクスチャーの読み込み
textureBar = Content.Load<Texture2D>("bar");
textureBall = Content.Load<Texture2D>("ball");
textureBlock = Content.Load<Texture2D>("block");
}
protected override void UnloadContent()
{
}
protected override void Update(GameTime gameTime)
{
if (GamePad.GetState(PlayerIndex.One).Buttons.Back == ButtonState.Pressed || Keyboard.GetState().IsKeyDown(Keys.Escape))
Exit();
// バーの移動処理
barPositionX = Mouse.GetState().X - BarWidth / 2;
// 画面からはみ出ないように制限
barPositionX = MathHelper.Clamp(barPositionX, 0, WindowWidth - BarWidth);
// ボールを速度の分だけ移動させる
ballPosition += ballVelocity;
// ボールが下向きに飛んできて、バーが接触していたら、跳ね返す
if (ballVelocity.Y > 0 && BallIntersectsBar())
{
// ボールがバーの中心からどれくらい離れているか
float distanceFromBarCenter = (ballPosition.X + BallWidth / 2) - (barPositionX + BarWidth / 2);
// バーの中心であれば、90度(真上)とする。
// バーの中心から左に離れていれば、最大で90度+80度とする。
// バーの中心から右に離れていれば、最大で90度-80度とする。
float angle = 90f - (distanceFromBarCenter / (BarWidth / 2)) * 80f;
// ボールの速さ(方向を抜きにした、ベクトルの長さ)を求める
float speed = ballVelocity.Length();
// 角度を度数法からラジアン法に変換
float radian = MathHelper.ToRadians(angle);
// 速さはそのままで、新しい角度にする
ballVelocity = new Vector2((float)Math.Cos(radian), -(float)Math.Sin(radian)) * speed;
}
// ボールの左端が左の壁にめり込んでいる、
// または
// ボールの右端が右の壁にめり込んでいる場合
if (ballPosition.X < 0 || ballPosition.X + BallWidth >= WindowWidth)
{
// 移動速度の左右を反転させる
ballVelocity.X *= -1;
}
// ボールの上端が上の壁にめり込んでいる、
// または
// ボールの下端が下の壁にめり込んでいる場合
if (ballPosition.Y < 0 || ballPosition.Y + BallHeight >= WindowHeight)
{
// 移動速度の上下を反転させる
ballVelocity.Y *= -1;
}
base.Update(gameTime);
}
// ボールとバーが接触しているか?
bool BallIntersectsBar()
{
float ballLeft = ballPosition.X;
float ballRight = ballPosition.X + BallWidth;
float ballTop = ballPosition.Y;
float ballBottom = ballPosition.Y + BallHeight;
float barLeft = barPositionX;
float barRight = barPositionX + BarWidth;
float barTop = BarPositionY;
float barBottom = BarPositionY + 1;
return ballLeft < barRight && ballRight > barLeft && ballTop < barBottom && ballBottom > barTop;
}
protected override void Draw(GameTime gameTime)
{
GraphicsDevice.Clear(Color.CornflowerBlue);
// SpriteBatchで描画するために必要
spriteBatch.Begin();
// バーの描画
spriteBatch.Draw(textureBar, new Vector2(barPositionX, BarPositionY), Color.White);
// ボールの描画
spriteBatch.Draw(textureBall, ballPosition, Color.White);
// SpriteBatchで描画するために必要
spriteBatch.End();
base.Draw(gameTime);
}
}
}
これによりプレイヤーは、ゲームの世界に影響を与えられる悦びと、プレイが上達する悦びを得られます。
ブロックの作成
いよいよブロックを作りましょう。
移動するブロックがあるとか、ブロック毎に大きさが異なるとか、そういう仕様があるなら話は別ですが、同じ大きさのブロックが規則正しく並ぶ仕様の場合は、2次元配列を使うと最も簡単で効率良く実現できます。
using Microsoft.Xna.Framework;
using Microsoft.Xna.Framework.Graphics;
using Microsoft.Xna.Framework.Input;
using System; // Mathを使うのに必要
namespace BlockBreaker
{
public class Game1 : Game
{
static readonly int WindowWidth = 320; // ウィンドウの幅
static readonly int WindowHeight = 480; // ウィンドウの高さ
static readonly int BallWidth = 10; // ボールの幅
static readonly int BallHeight = 10; // ボールの高さ
static readonly int BarWidth = 80; // バーの幅
static readonly int BarPositionY = 440; // バーのy座標(上端)
static readonly int BlockWidth = 40; // ブロックの幅
static readonly int BlockHeight = 20; // ブロックの高さ
GraphicsDeviceManager graphics;
SpriteBatch spriteBatch;
Texture2D textureBar; // バーの画像
Texture2D textureBall; // ボールの画像
Texture2D textureBlock; // ブロックの画像
Vector2 ballVelocity = new Vector2(3, -3); // ボールの速度
Vector2 ballPosition = new Vector2(160, 400); // ボールの位置(左上の座標)
int barPositionX = 160; // バーのx座標(左端)
// ブロックの場所。
// 0は何もない場所。1はブロック。
int[,] blocks = {
{1,1,0,0,1,1,0,0},
{1,1,0,0,1,1,0,0},
{0,0,1,1,0,0,1,1},
{0,0,1,1,0,0,1,1},
{1,1,0,0,1,1,0,0},
{1,1,0,0,1,1,0,0},
{0,0,1,1,0,0,1,1},
{0,0,1,1,0,0,1,1},
};
public Game1()
{
graphics = new GraphicsDeviceManager(this);
Content.RootDirectory = "Content";
// ウィンドウサイズ変更
graphics.PreferredBackBufferWidth = WindowWidth;
graphics.PreferredBackBufferHeight = WindowHeight;
graphics.ApplyChanges();
// マウスを表示する
IsMouseVisible = true;
}
protected override void Initialize()
{
base.Initialize();
}
protected override void LoadContent()
{
spriteBatch = new SpriteBatch(GraphicsDevice);
// テクスチャーの読み込み
textureBar = Content.Load<Texture2D>("bar");
textureBall = Content.Load<Texture2D>("ball");
textureBlock = Content.Load<Texture2D>("block");
}
protected override void UnloadContent()
{
}
protected override void Update(GameTime gameTime)
{
if (GamePad.GetState(PlayerIndex.One).Buttons.Back == ButtonState.Pressed || Keyboard.GetState().IsKeyDown(Keys.Escape))
Exit();
// バーの移動処理
barPositionX = Mouse.GetState().X - BarWidth / 2;
// 画面からはみ出ないように制限
barPositionX = MathHelper.Clamp(barPositionX, 0, WindowWidth - BarWidth);
// ボールを速度の分だけ移動させる
ballPosition += ballVelocity;
// ボールが下向きに飛んできて、バーが接触していたら、跳ね返す
if (ballVelocity.Y > 0 && BallIntersectsBar())
{
// ボールがバーの中心からどれくらい離れているか
float distanceFromBarCenter = (ballPosition.X + BallWidth / 2) - (barPositionX + BarWidth / 2);
// バーの中心であれば、90度(真上)とする。
// バーの中心から左に離れていれば、最大で90度+80度とする。
// バーの中心から右に離れていれば、最大で90度-80度とする。
float angle = 90f - (distanceFromBarCenter / (BarWidth / 2)) * 80f;
// ボールの速さ(方向を抜きにした、ベクトルの長さ)を求める
float speed = ballVelocity.Length();
// 角度を度数法からラジアン法に変換
float radian = MathHelper.ToRadians(angle);
// 速さはそのままで、新しい角度にする
ballVelocity = new Vector2((float)Math.Cos(radian), -(float)Math.Sin(radian)) * speed;
}
// ボールの左端が左の壁にめり込んでいる、
// または
// ボールの右端が右の壁にめり込んでいる場合
if (ballPosition.X < 0 || ballPosition.X + BallWidth >= WindowWidth)
{
// 移動速度の左右を反転させる
ballVelocity.X *= -1;
}
// ボールの上端が上の壁にめり込んでいる、
// または
// ボールの下端が下の壁にめり込んでいる場合
if (ballPosition.Y < 0 || ballPosition.Y + BallHeight >= WindowHeight)
{
// 移動速度の上下を反転させる
ballVelocity.Y *= -1;
}
base.Update(gameTime);
}
// ボールとバーが接触しているか?
bool BallIntersectsBar()
{
float ballLeft = ballPosition.X;
float ballRight = ballPosition.X + BallWidth;
float ballTop = ballPosition.Y;
float ballBottom = ballPosition.Y + BallHeight;
float barLeft = barPositionX;
float barRight = barPositionX + BarWidth;
float barTop = BarPositionY;
float barBottom = BarPositionY + 1;
return ballLeft < barRight && ballRight > barLeft && ballTop < barBottom && ballBottom > barTop;
}
protected override void Draw(GameTime gameTime)
{
GraphicsDevice.Clear(Color.CornflowerBlue);
// SpriteBatchで描画するために必要
spriteBatch.Begin();
// ブロックの描画
for (int y = 0; y < blocks.GetLength(0); y++)
{
for (int x = 0; x < blocks.GetLength(1); x++)
{
if (blocks[y, x] == 1)
{
spriteBatch.Draw(textureBlock, new Vector2(BlockWidth * x, BlockHeight * y), Color.White);
}
}
}
// バーの描画
spriteBatch.Draw(textureBar, new Vector2(barPositionX, BarPositionY), Color.White);
// ボールの描画
spriteBatch.Draw(textureBall, ballPosition, Color.White);
// SpriteBatchで描画するために必要
spriteBatch.End();
base.Draw(gameTime);
}
}
}

2次元配列で定義した通りに、ブロックが表示されました。2次元配列とブロックの対応がよくわからない場合は、2次元配列の初期値を変更して結果を見てみてください。0が何もない場所、1がブロックを表しています。
今回のプログラムでは [y, x] というふうに指定しています。[x, y]ではないので注意してください。なぜ [y, x] にしたのかというと、今回は下記のようにプログラム中に直接、ブロックの初期位置を書いているからです。
// ブロックの場所。このようにした場合は 1次元目が行番号、2次元目が列番号として扱われます。つまり [y, x] という感じになります。
// 0は何もない場所。1はブロック。
int[,] blocks = {
{1,1,0,0,1,1,0,0},
{1,1,0,0,1,1,0,0},
{0,0,1,1,0,0,1,1},
{0,0,1,1,0,0,1,1},
{1,1,0,0,1,1,0,0},
{1,1,0,0,1,1,0,0},
{0,0,1,1,0,0,1,1},
{0,0,1,1,0,0,1,1},
};
この配列では、ブロックがあるかないかを表したいだけなので、bool型の2次元配列でも良かったのですが、int型にしておけば、後々、色々な種類のブロックを登場させたいとか、ブロックに耐久力を持たせたいとか、そういうのに簡単に対応できそうなので、int型2次元配列にしました。
ボールとブロックの衝突判定
ボールとブロックとの衝突判定を作っていきたいと思います。ここから非常にややこしくなります。自力でブロック崩しを作ろうと試みた多くの初心者が、ここで挫折します。もしくは、雑で完成度の低い処理でお茶を濁します。
衝突の検出は簡単なのです。ボールとバーの衝突判定と同様に、四角形と四角形が重なっているかを調べれば良いだけです。では何が難しいのかというと、衝突を検出したあと、ボールをどの方向に跳ね返すのかを決めるのが難しいのです。
例えば、下図のように、ボールとブロックがぶつかった場合。ぶつかったかどうかを調べるのは簡単ですが、どういう方向でぶつかったのかを調べ、そしてどの方向に跳ね返せば良いのかを決定するのが面倒なのです。
この場合は、ボールの上側とブロックの下側がぶつかったと判定し、ボールを下向きに跳ね返す必要がありますが、それをどうやって判定したら良いでしょうか?
また、ボールはあらゆる方向から、あらゆる角度でぶつかってきます。
また、ボールはあらゆる方向から、あらゆる角度でぶつかってきます。
あらゆるケースで、違和感なく跳ね返す必要があります。
同時に3つのブロックと重なる可能性だって十分にあります。
この場合は、逆向きに跳ね返すのが妥当ですが…
単純な四角形と四角形の衝突判定のみでは、これを実現するプログラムを書くことは困難です。
実は私もこの記事を書くにあたって、いろいろ試してみたのですが、納得いくプログラムがなかなか書けずに難儀しました…
次のような失敗を重ねました。
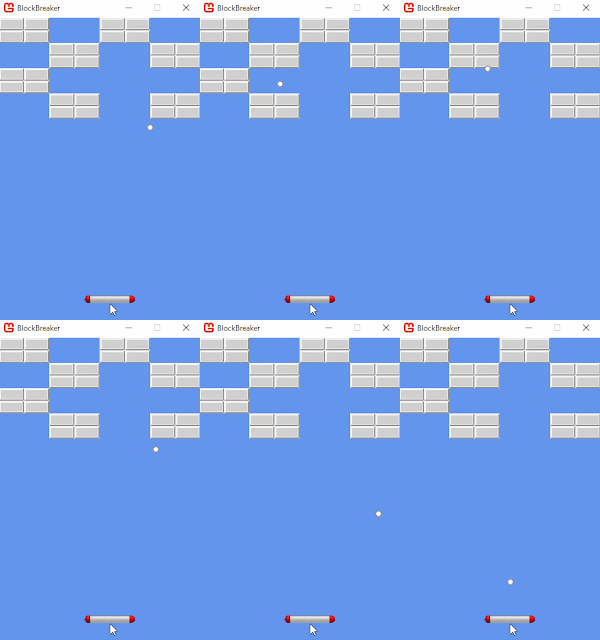
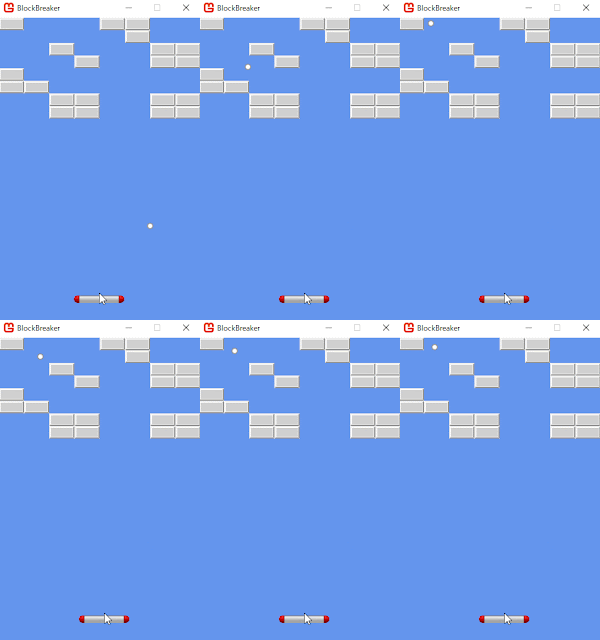
まあ、こういう試行錯誤を繰り返すのも良い勉強にはなりますがね…
で、最終的には、四角形同士の衝突判定ではなく、点と四角形の衝突判定で行うことにしました。これがもっともプログラムが短く、かつ動きに違和感の無い結果になりました。

この赤い4点について、ブロックまたは壁とぶつかっているかを調べます。
上の赤い点がブロックか壁にぶつかっていたら、下向きに跳ね返せば良いです。
左の赤い点がブロックか壁にぶつかっていたら、右向きに跳ね返せば良いです。
(この方式でやるなら、ボールの画像サイズを奇数にすべきでした…)
この方式でやれば、下図のように複数のブロックに同時にぶつかったときでも、特殊な処理を行う必要はありません。

上がぶつかっているから下向きに跳ね返され、かつ左もぶつかっているから右向きに跳ね返され、結果として右下に跳ね返っていきます。
IsBlockOrWallメソッドでは、指定された座標にブロックがあるかどうか、あるいはウィンドウの外側ではないかを調べています。何故ブロックと壁の判定を同時に行っているかというと、ボールにとってはブロックも壁も、区別する必要が無いからです。同じに扱えたほうがプログラムが簡潔になります。
何故単純に左右反転ではなくて、常に左に飛ぶようにしているかというと、次のような微妙なぶつかりかたをしたときのためです。

このようなぶつかりかたをしたとき、左右反転させてしまうと、次のようになります。

これは気持ち悪いですよね?
気持ち悪いだけでなく、ブロックが壊せないブロックだった場合は、次のような変な挙動をすることとなります。

というわけで、ボールの右側がブロックにぶつかったときは、移動速度の左右を反転させるのではなく、常に左方向に飛ぶようにしています。
なお、物理的に正しくは、次のような角度で跳ね返るはずですが…
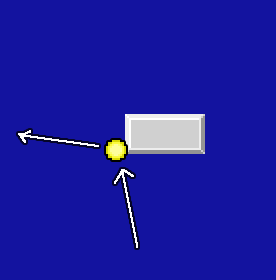
こうなると、ボールが突然予想しなかった角度に跳ね返ることが多発し、運ゲーというか、反射神経ゲーに近づいていってしまいます。
ゲームというものは、リアルであれば良いというわけではないので注意が必要です。リアルこそが至高なのであれば、誰もゲームなんてやらずに現実世界でエンジョイしてるはずですから。
しかし、かといって、あまりにも非現実的であると、「チープ」「子供だまし」という印象を与えて、感情移入してもらえないので、本当にさじ加減が難しい問題ではあります。

いよいよ完成が近づいてきました。
実は私もこの記事を書くにあたって、いろいろ試してみたのですが、納得いくプログラムがなかなか書けずに難儀しました…
次のような失敗を重ねました。


まあ、こういう試行錯誤を繰り返すのも良い勉強にはなりますがね…
で、最終的には、四角形同士の衝突判定ではなく、点と四角形の衝突判定で行うことにしました。これがもっともプログラムが短く、かつ動きに違和感の無い結果になりました。

この赤い4点について、ブロックまたは壁とぶつかっているかを調べます。
上の赤い点がブロックか壁にぶつかっていたら、下向きに跳ね返せば良いです。
左の赤い点がブロックか壁にぶつかっていたら、右向きに跳ね返せば良いです。
(この方式でやるなら、ボールの画像サイズを奇数にすべきでした…)
この方式でやれば、下図のように複数のブロックに同時にぶつかったときでも、特殊な処理を行う必要はありません。

上がぶつかっているから下向きに跳ね返され、かつ左もぶつかっているから右向きに跳ね返され、結果として右下に跳ね返っていきます。
using Microsoft.Xna.Framework;元々あった、ボールと壁(ウィンドウ端)との衝突判定の処理は、削除しました(IsBlockOrWallメソッドに同様の処理が移動しました)。
using Microsoft.Xna.Framework.Graphics;
using Microsoft.Xna.Framework.Input;
using System; // Mathを使うのに必要
namespace BlockBreaker
{
public class Game1 : Game
{
static readonly int WindowWidth = 320; // ウィンドウの幅
static readonly int WindowHeight = 480; // ウィンドウの高さ
static readonly int BallWidth = 10; // ボールの幅
static readonly int BallHeight = 10; // ボールの高さ
static readonly int BarWidth = 80; // バーの幅
static readonly int BarPositionY = 440; // バーのy座標(上端)
static readonly int BlockWidth = 40; // ブロックの幅
static readonly int BlockHeight = 20; // ブロックの高さ
GraphicsDeviceManager graphics;
SpriteBatch spriteBatch;
Texture2D textureBar; // バーの画像
Texture2D textureBall; // ボールの画像
Texture2D textureBlock; // ブロックの画像
Vector2 ballVelocity = new Vector2(3, -3); // ボールの速度
Vector2 ballPosition = new Vector2(160, 400); // ボールの位置(左上の座標)
int barPositionX = 160; // バーのx座標(左端)
// ブロックの場所。
// 0は何もない場所。1はブロック。
int[,] blocks = {
{1,1,0,0,1,1,0,0},
{1,1,0,0,1,1,0,0},
{0,0,1,1,0,0,1,1},
{0,0,1,1,0,0,1,1},
{1,1,0,0,1,1,0,0},
{1,1,0,0,1,1,0,0},
{0,0,1,1,0,0,1,1},
{0,0,1,1,0,0,1,1},
};
public Game1()
{
graphics = new GraphicsDeviceManager(this);
Content.RootDirectory = "Content";
// ウィンドウサイズ変更
graphics.PreferredBackBufferWidth = WindowWidth;
graphics.PreferredBackBufferHeight = WindowHeight;
graphics.ApplyChanges();
// マウスを表示する
IsMouseVisible = true;
}
protected override void Initialize()
{
base.Initialize();
}
protected override void LoadContent()
{
spriteBatch = new SpriteBatch(GraphicsDevice);
// テクスチャーの読み込み
textureBar = Content.Load<Texture2D>("bar");
textureBall = Content.Load<Texture2D>("ball");
textureBlock = Content.Load<Texture2D>("block");
}
protected override void UnloadContent()
{
}
protected override void Update(GameTime gameTime)
{
if (GamePad.GetState(PlayerIndex.One).Buttons.Back == ButtonState.Pressed || Keyboard.GetState().IsKeyDown(Keys.Escape))
Exit();
// バーの移動処理
barPositionX = Mouse.GetState().X - BarWidth / 2;
// 画面からはみ出ないように制限
barPositionX = MathHelper.Clamp(barPositionX, 0, WindowWidth - BarWidth);
// ボールを速度の分だけ移動させる
ballPosition += ballVelocity;
// ボールが下向きに飛んできて、バーが接触していたら、跳ね返す
if (ballVelocity.Y > 0 && BallIntersectsBar())
{
// ボールがバーの中心からどれくらい離れているか
float distanceFromBarCenter = (ballPosition.X + BallWidth / 2) - (barPositionX + BarWidth / 2);
// バーの中心であれば、90度(真上)とする。
// バーの中心から左に離れていれば、最大で90度+80度とする。
// バーの中心から右に離れていれば、最大で90度-80度とする。
float angle = 90f - (distanceFromBarCenter / (BarWidth / 2)) * 80f;
// ボールの速さ(方向を抜きにした、ベクトルの長さ)を求める
float speed = ballVelocity.Length();
// 角度を度数法からラジアン法に変換
float radian = MathHelper.ToRadians(angle);
// 速さはそのままで、新しい角度にする
ballVelocity = new Vector2((float)Math.Cos(radian), -(float)Math.Sin(radian)) * speed;
}
// ボールの四隅にブロックか壁があるかどうかを調べる
bool hitLeft = IsBlockOrWall(ballPosition + new Vector2(0, BallHeight / 2));
bool hitRight = IsBlockOrWall(ballPosition + new Vector2(BallWidth - 1, BallHeight / 2));
bool hitTop = IsBlockOrWall(ballPosition + new Vector2(BallWidth / 2, 0));
bool hitBottom = IsBlockOrWall(ballPosition + new Vector2(BallWidth /2, BallHeight));
if (hitLeft) // ボールの左がぶつかってたら
{
ballVelocity.X = Math.Abs(ballVelocity.X); // 右へ
}
if (hitRight) // ボールの右がぶつかってたら
{
ballVelocity.X = -Math.Abs(ballVelocity.X); // 左へ
}
if (hitTop) // ボールの上がぶつかってたら
{
ballVelocity.Y = Math.Abs(ballVelocity.Y); // 下へ
}
if (hitBottom) // ボールの下がぶつかってたら
{
ballVelocity.Y = -Math.Abs(ballVelocity.Y); // 上へ
}
base.Update(gameTime);
}
// ボールとバーが接触しているか?
bool BallIntersectsBar()
{
float ballLeft = ballPosition.X;
float ballRight = ballPosition.X + BallWidth;
float ballTop = ballPosition.Y;
float ballBottom = ballPosition.Y + BallHeight;
float barLeft = barPositionX;
float barRight = barPositionX + BarWidth;
float barTop = BarPositionY;
float barBottom = BarPositionY + 1;
return ballLeft < barRight && ballRight > barLeft && ballTop < barBottom && ballBottom > barTop;
}
// 指定された場所(スクリーン座標)がブロックまたは壁かどうか調べる。
// ブロックまたは壁であればtrueを返却する。
bool IsBlockOrWall(Vector2 screenPoint)
{
// 左の壁と接触してるか
if (screenPoint.X < 0)
return true;
// 右の壁と接触してるか
if (screenPoint.X >= WindowWidth)
return true;
// 上の壁と接触してるか
if (screenPoint.Y < 0)
return true;
// スクリーン座標をブロックの配列のインデックスに変換
int x = (int)screenPoint.X / BlockWidth;
int y = (int)screenPoint.Y / BlockHeight;
// ブロックの配列の範囲外かチェック
if (x < 0 || x >= blocks.GetLength(1) || y < 0 || y >= blocks.GetLength(0))
return false;
// 指定された場所はブロックか?
return blocks[y, x] > 0;
}
protected override void Draw(GameTime gameTime)
{
GraphicsDevice.Clear(Color.CornflowerBlue);
// SpriteBatchで描画するために必要
spriteBatch.Begin();
// ブロックの描画
for (int y = 0; y < blocks.GetLength(0); y++)
{
for (int x = 0; x < blocks.GetLength(1); x++)
{
if (blocks[y, x] == 1)
{
spriteBatch.Draw(textureBlock, new Vector2(BlockWidth * x, BlockHeight * y), Color.White);
}
}
}
// バーの描画
spriteBatch.Draw(textureBar, new Vector2(barPositionX, BarPositionY), Color.White);
// ボールの描画
spriteBatch.Draw(textureBall, ballPosition, Color.White);
// SpriteBatchで描画するために必要
spriteBatch.End();
base.Draw(gameTime);
}
}
}
IsBlockOrWallメソッドでは、指定された座標にブロックがあるかどうか、あるいはウィンドウの外側ではないかを調べています。何故ブロックと壁の判定を同時に行っているかというと、ボールにとってはブロックも壁も、区別する必要が無いからです。同じに扱えたほうがプログラムが簡潔になります。
if (hitRight) // ボールの右がぶつかってたらここで使っているMath.Abs()というのは、引数で渡した数の絶対値を返却してくれるメソッドです。プラスの数を渡せばそのまま返ってきて、マイナスの数を渡せばプラスになって返ってきます。同様のことはif文を使っても簡単に出来ますが、Absを使ったほうがプログラムがより短くなり、また、意図も明確になるので、Absを使います。
{
ballVelocity.X = -Math.Abs(ballVelocity.X); // 左へ
}
何故単純に左右反転ではなくて、常に左に飛ぶようにしているかというと、次のような微妙なぶつかりかたをしたときのためです。

このようなぶつかりかたをしたとき、左右反転させてしまうと、次のようになります。

これは気持ち悪いですよね?
気持ち悪いだけでなく、ブロックが壊せないブロックだった場合は、次のような変な挙動をすることとなります。

というわけで、ボールの右側がブロックにぶつかったときは、移動速度の左右を反転させるのではなく、常に左方向に飛ぶようにしています。
なお、物理的に正しくは、次のような角度で跳ね返るはずですが…

こうなると、ボールが突然予想しなかった角度に跳ね返ることが多発し、運ゲーというか、反射神経ゲーに近づいていってしまいます。
ゲームというものは、リアルであれば良いというわけではないので注意が必要です。リアルこそが至高なのであれば、誰もゲームなんてやらずに現実世界でエンジョイしてるはずですから。
しかし、かといって、あまりにも非現実的であると、「チープ」「子供だまし」という印象を与えて、感情移入してもらえないので、本当にさじ加減が難しい問題ではあります。

いよいよ完成が近づいてきました。
ブロックを破壊する
ブロック崩しはブロックを破壊するゲームなので、ボールが当たったブロックが消える処理を追加しましょう。
using Microsoft.Xna.Framework;BreakBlockというメソッドを作りました。これは、指定された場所に存在するブロックを消すというものです。指定された場所にブロックが存在しなくても呼んで良い作りにしてあります。なので、ボールが何かにぶつかった際は、相手がブロックだろうが壁だろうが気にせずに、とりあえずBreakBlockメソッドを呼び出しています。
using Microsoft.Xna.Framework.Graphics;
using Microsoft.Xna.Framework.Input;
using System; // Mathを使うのに必要
namespace BlockBreaker
{
public class Game1 : Game
{
static readonly int WindowWidth = 320; // ウィンドウの幅
static readonly int WindowHeight = 480; // ウィンドウの高さ
static readonly int BallWidth = 10; // ボールの幅
static readonly int BallHeight = 10; // ボールの高さ
static readonly int BarWidth = 80; // バーの幅
static readonly int BarPositionY = 440; // バーのy座標(上端)
static readonly int BlockWidth = 40; // ブロックの幅
static readonly int BlockHeight = 20; // ブロックの高さ
GraphicsDeviceManager graphics;
SpriteBatch spriteBatch;
Texture2D textureBar; // バーの画像
Texture2D textureBall; // ボールの画像
Texture2D textureBlock; // ブロックの画像
Vector2 ballVelocity = new Vector2(3, -3); // ボールの速度
Vector2 ballPosition = new Vector2(160, 400); // ボールの位置(左上の座標)
int barPositionX = 160; // バーのx座標(左端)
// ブロックの場所。
// 0は何もない場所。1はブロック。
int[,] blocks = {
{1,1,0,0,1,1,0,0},
{1,1,0,0,1,1,0,0},
{0,0,1,1,0,0,1,1},
{0,0,1,1,0,0,1,1},
{1,1,0,0,1,1,0,0},
{1,1,0,0,1,1,0,0},
{0,0,1,1,0,0,1,1},
{0,0,1,1,0,0,1,1},
};
public Game1()
{
graphics = new GraphicsDeviceManager(this);
Content.RootDirectory = "Content";
// ウィンドウサイズ変更
graphics.PreferredBackBufferWidth = WindowWidth;
graphics.PreferredBackBufferHeight = WindowHeight;
graphics.ApplyChanges();
// マウスを表示する
IsMouseVisible = true;
}
protected override void Initialize()
{
base.Initialize();
}
protected override void LoadContent()
{
spriteBatch = new SpriteBatch(GraphicsDevice);
// テクスチャーの読み込み
textureBar = Content.Load<Texture2D>("bar");
textureBall = Content.Load<Texture2D>("ball");
textureBlock = Content.Load<Texture2D>("block");
}
protected override void UnloadContent()
{
}
protected override void Update(GameTime gameTime)
{
if (GamePad.GetState(PlayerIndex.One).Buttons.Back == ButtonState.Pressed || Keyboard.GetState().IsKeyDown(Keys.Escape))
Exit();
// バーの移動処理
barPositionX = Mouse.GetState().X - BarWidth / 2;
// 画面からはみ出ないように制限
barPositionX = MathHelper.Clamp(barPositionX, 0, WindowWidth - BarWidth);
// ボールを速度の分だけ移動させる
ballPosition += ballVelocity;
// ボールが下向きに飛んできて、バーが接触していたら、跳ね返す
if (ballVelocity.Y > 0 && BallIntersectsBar())
{
// ボールがバーの中心からどれくらい離れているか
float distanceFromBarCenter = (ballPosition.X + BallWidth / 2) - (barPositionX + BarWidth / 2);
// バーの中心であれば、90度(真上)とする。
// バーの中心から左に離れていれば、最大で90度+80度とする。
// バーの中心から右に離れていれば、最大で90度-80度とする。
float angle = 90f - (distanceFromBarCenter / (BarWidth / 2)) * 80f;
// ボールの速さ(方向を抜きにした、ベクトルの長さ)を求める
float speed = ballVelocity.Length();
// 角度を度数法からラジアン法に変換
float radian = MathHelper.ToRadians(angle);
// 速さはそのままで、新しい角度にする
ballVelocity = new Vector2((float)Math.Cos(radian), -(float)Math.Sin(radian)) * speed;
}
// ボールの四隅にブロックか壁があるかどうかを調べる
bool hitLeft = IsBlockOrWall(ballPosition + new Vector2(0, BallHeight / 2));
bool hitRight = IsBlockOrWall(ballPosition + new Vector2(BallWidth - 1, BallHeight / 2));
bool hitTop = IsBlockOrWall(ballPosition + new Vector2(BallWidth / 2, 0));
bool hitBottom = IsBlockOrWall(ballPosition + new Vector2(BallWidth / 2, BallHeight));
if (hitLeft) // ボールの左がぶつかってたら
{
ballVelocity.X = Math.Abs(ballVelocity.X); // 右へ
BreakBlock(ballPosition + new Vector2(0, BallHeight / 2));
}
if (hitRight) // ボールの右がぶつかってたら
{
ballVelocity.X = -Math.Abs(ballVelocity.X); // 左へ
BreakBlock(ballPosition + new Vector2(BallWidth - 1, BallHeight / 2));
}
if (hitTop) // ボールの上がぶつかってたら
{
ballVelocity.Y = Math.Abs(ballVelocity.Y); // 下へ
BreakBlock(ballPosition + new Vector2(BallWidth / 2, 0));
}
if (hitBottom) // ボールの下がぶつかってたら
{
ballVelocity.Y = -Math.Abs(ballVelocity.Y); // 上へ
BreakBlock(ballPosition + new Vector2(BallWidth / 2, BallHeight));
}
base.Update(gameTime);
}
// ボールとバーが接触しているか?
bool BallIntersectsBar()
{
float ballLeft = ballPosition.X;
float ballRight = ballPosition.X + BallWidth;
float ballTop = ballPosition.Y;
float ballBottom = ballPosition.Y + BallHeight;
float barLeft = barPositionX;
float barRight = barPositionX + BarWidth;
float barTop = BarPositionY;
float barBottom = BarPositionY + 1;
return ballLeft < barRight && ballRight > barLeft && ballTop < barBottom && ballBottom > barTop;
}
// 指定された場所(スクリーン座標)がブロックまたは壁かどうか調べる。
// ブロックまたは壁であればtrueを返却する。
bool IsBlockOrWall(Vector2 screenPoint)
{
// 左の壁と接触してるか
if (screenPoint.X < 0)
return true;
// 右の壁と接触してるか
if (screenPoint.X >= WindowWidth)
return true;
// 上の壁と接触してるか
if (screenPoint.Y < 0)
return true;
// スクリーン座標をブロックの配列のインデックスに変換
int x = (int)screenPoint.X / BlockWidth;
int y = (int)screenPoint.Y / BlockHeight;
// ブロックの配列の範囲外かチェック
if (x < 0 || x >= blocks.GetLength(1) || y < 0 || y >= blocks.GetLength(0))
return false;
// 指定された場所はブロックか?
return blocks[y, x] > 0;
}
// 指定された場所(スクリーン座標)に存在するブロックを破壊する
void BreakBlock(Vector2 screenPoint)
{
// スクリーン座標をブロックの配列のインデックスに変換
int x = (int)screenPoint.X / BlockWidth;
int y = (int)screenPoint.Y / BlockHeight;
// ブロックの配列の範囲外かチェック
if (x < 0 || x >= blocks.GetLength(1) || y < 0 || y >= blocks.GetLength(0))
return;
// 指定された場所のブロックを消す
blocks[y, x] = 0;
}
protected override void Draw(GameTime gameTime)
{
GraphicsDevice.Clear(Color.CornflowerBlue);
// SpriteBatchで描画するために必要
spriteBatch.Begin();
// ブロックの描画
for (int y = 0; y < blocks.GetLength(0); y++)
{
for (int x = 0; x < blocks.GetLength(1); x++)
{
if (blocks[y, x] == 1)
{
spriteBatch.Draw(textureBlock, new Vector2(BlockWidth * x, BlockHeight * y), Color.White);
}
}
}
// バーの描画
spriteBatch.Draw(textureBar, new Vector2(barPositionX, BarPositionY), Color.White);
// ボールの描画
spriteBatch.Draw(textureBall, ballPosition, Color.White);
// SpriteBatchで描画するために必要
spriteBatch.End();
base.Draw(gameTime);
}
}
}

ゲームの状態管理
現状、プログラムを起動すると、直ちにゲームが始まってしまいます。また、クリアやゲームオーバーもありません。このあたりを作って、ゲームを仕上げていきましょう。
Updateメソッド内でやることが多くなってきたので、今までUpdateメソッド内で行っていた処理はUpdatePlayというメソッドに移しています。
using Microsoft.Xna.Framework;
using Microsoft.Xna.Framework.Graphics;
using Microsoft.Xna.Framework.Input;
using System; // Mathを使うのに必要
namespace BlockBreaker
{
// ゲームの状態種別
enum GameState
{
Ready,
Play,
GameOver,
Clear,
}
public class Game1 : Game
{
static readonly int WindowWidth = 320; // ウィンドウの幅
static readonly int WindowHeight = 480; // ウィンドウの高さ
static readonly int BallWidth = 10; // ボールの幅
static readonly int BallHeight = 10; // ボールの高さ
static readonly int BarWidth = 80; // バーの幅
static readonly int BarPositionY = 440; // バーのy座標(上端)
static readonly int BlockWidth = 40; // ブロックの幅
static readonly int BlockHeight = 20; // ブロックの高さ
GraphicsDeviceManager graphics;
SpriteBatch spriteBatch;
Texture2D textureBar; // バーの画像
Texture2D textureBall; // ボールの画像
Texture2D textureBlock; // ブロックの画像
Vector2 ballVelocity = new Vector2(3, -3); // ボールの速度
Vector2 ballPosition = new Vector2(160, 400); // ボールの位置(左上の座標)
int barPositionX = 160; // バーのx座標(左端)
GameState state = GameState.Ready;
// ブロックの場所。
// 0は何もない場所。1はブロック。
int[,] blocks = {
{1,1,0,0,1,1,0,0},
{1,1,0,0,1,1,0,0},
{0,0,1,1,0,0,1,1},
{0,0,1,1,0,0,1,1},
{1,1,0,0,1,1,0,0},
{1,1,0,0,1,1,0,0},
{0,0,1,1,0,0,1,1},
{0,0,1,1,0,0,1,1},
};
public Game1()
{
graphics = new GraphicsDeviceManager(this);
Content.RootDirectory = "Content";
// ウィンドウサイズ変更
graphics.PreferredBackBufferWidth = WindowWidth;
graphics.PreferredBackBufferHeight = WindowHeight;
graphics.ApplyChanges();
// マウスを表示する
IsMouseVisible = true;
}
protected override void Initialize()
{
base.Initialize();
}
protected override void LoadContent()
{
spriteBatch = new SpriteBatch(GraphicsDevice);
// テクスチャーの読み込み
textureBar = Content.Load<Texture2D>("bar");
textureBall = Content.Load<Texture2D>("ball");
textureBlock = Content.Load<Texture2D>("block");
}
protected override void UnloadContent()
{
}
protected override void Update(GameTime gameTime)
{
if (GamePad.GetState(PlayerIndex.One).Buttons.Back == ButtonState.Pressed || Keyboard.GetState().IsKeyDown(Keys.Escape))
Exit();
if (state == GameState.Ready)
{
UpdateReady();
}
else if (state == GameState.Play)
{
UpdatePlay();
}
else if (state == GameState.Clear)
{
}
else if (state == GameState.GameOver)
{
}
base.Update(gameTime);
}
// Ready状態の処理
void UpdateReady()
{
// バーの移動処理
barPositionX = Mouse.GetState().X - BarWidth / 2;
// 画面からはみ出ないように制限
barPositionX = MathHelper.Clamp(barPositionX, 0, WindowWidth - BarWidth);
// ボールも追従させる
ballPosition = new Vector2(barPositionX + BarWidth / 2 - BallWidth / 2, BarPositionY - BallHeight);
// マウス左ボタンが押されたら、ゲーム開始
if (Mouse.GetState().LeftButton == ButtonState.Pressed)
{
state = GameState.Play;
}
}
void UpdatePlay()
{
// バーの移動処理
barPositionX = Mouse.GetState().X - BarWidth / 2;
// 画面からはみ出ないように制限
barPositionX = MathHelper.Clamp(barPositionX, 0, WindowWidth - BarWidth);
// ボールを速度の分だけ移動させる
ballPosition += ballVelocity;
// ボールが下向きに飛んできて、バーが接触していたら、跳ね返す
if (ballVelocity.Y > 0 && BallIntersectsBar())
{
// ボールがバーの中心からどれくらい離れているか
float distanceFromBarCenter = (ballPosition.X + BallWidth / 2) - (barPositionX + BarWidth / 2);
// バーの中心であれば、90度(真上)とする。
// バーの中心から左に離れていれば、最大で90度+80度とする。
// バーの中心から右に離れていれば、最大で90度-80度とする。
float angle = 90f - (distanceFromBarCenter / (BarWidth / 2)) * 80f;
// ボールの速さ(方向を抜きにした、ベクトルの長さ)を求める
float speed = ballVelocity.Length();
// 角度を度数法からラジアン法に変換
float radian = MathHelper.ToRadians(angle);
// 速さはそのままで、新しい角度にする
ballVelocity = new Vector2((float)Math.Cos(radian), -(float)Math.Sin(radian)) * speed;
}
// ボールの四隅にブロックか壁があるかどうかを調べる
bool hitLeft = IsBlockOrWall(ballPosition + new Vector2(0, BallHeight / 2));
bool hitRight = IsBlockOrWall(ballPosition + new Vector2(BallWidth - 1, BallHeight / 2));
bool hitTop = IsBlockOrWall(ballPosition + new Vector2(BallWidth / 2, 0));
bool hitBottom = IsBlockOrWall(ballPosition + new Vector2(BallWidth / 2, BallHeight));
if (hitLeft) // ボールの左がぶつかってたら
{
ballVelocity.X = Math.Abs(ballVelocity.X); // 右へ
BreakBlock(ballPosition + new Vector2(0, BallHeight / 2));
}
if (hitRight) // ボールの右がぶつかってたら
{
ballVelocity.X = -Math.Abs(ballVelocity.X); // 左へ
BreakBlock(ballPosition + new Vector2(BallWidth - 1, BallHeight / 2));
}
if (hitTop) // ボールの上がぶつかってたら
{
ballVelocity.Y = Math.Abs(ballVelocity.Y); // 下へ
BreakBlock(ballPosition + new Vector2(BallWidth / 2, 0));
}
if (hitBottom) // ボールの下がぶつかってたら
{
ballVelocity.Y = -Math.Abs(ballVelocity.Y); // 上へ
BreakBlock(ballPosition + new Vector2(BallWidth / 2, BallHeight));
}
// ブロックが全部消えたらクリア
if (CountBlocks() == 0)
{
state = GameState.Clear;
}
// ボールが画面下に消えたらゲームオーバー
if (ballPosition.Y >= WindowHeight)
{
state = GameState.GameOver;
}
}
// ボールとバーが接触しているか?
bool BallIntersectsBar()
{
float ballLeft = ballPosition.X;
float ballRight = ballPosition.X + BallWidth;
float ballTop = ballPosition.Y;
float ballBottom = ballPosition.Y + BallHeight;
float barLeft = barPositionX;
float barRight = barPositionX + BarWidth;
float barTop = BarPositionY;
float barBottom = BarPositionY + 1;
return ballLeft < barRight && ballRight > barLeft && ballTop < barBottom && ballBottom > barTop;
}
// 指定された場所(スクリーン座標)がブロックまたは壁かどうか調べる。
// ブロックまたは壁であればtrueを返却する。
bool IsBlockOrWall(Vector2 screenPoint)
{
// 左の壁と接触してるか
if (screenPoint.X < 0)
return true;
// 右の壁と接触してるか
if (screenPoint.X >= WindowWidth)
return true;
// 上の壁と接触してるか
if (screenPoint.Y < 0)
return true;
// スクリーン座標をブロックの配列のインデックスに変換
int x = (int)screenPoint.X / BlockWidth;
int y = (int)screenPoint.Y / BlockHeight;
// ブロックの配列の範囲外かチェック
if (x < 0 || x >= blocks.GetLength(1) || y < 0 || y >= blocks.GetLength(0))
return false;
// 指定された場所はブロックか?
return blocks[y, x] > 0;
}
// 指定された場所(スクリーン座標)に存在するブロックを破壊する
void BreakBlock(Vector2 screenPoint)
{
// スクリーン座標をブロックの配列のインデックスに変換
int x = (int)screenPoint.X / BlockWidth;
int y = (int)screenPoint.Y / BlockHeight;
// ブロックの配列の範囲外かチェック
if (x < 0 || x >= blocks.GetLength(1) || y < 0 || y >= blocks.GetLength(0))
return;
// 指定された場所のブロックを消す
blocks[y, x] = 0;
}
// ブロックの数を数える
int CountBlocks()
{
int count = 0;
for (int y = 0; y < blocks.GetLength(0); y++)
{
for (int x = 0; x < blocks.GetLength(1); x++)
{
if (blocks[y, x] != 0)
{
count++;
}
}
}
return count;
}
protected override void Draw(GameTime gameTime)
{
// ゲームの状態によって背景色を変更する
Color backgroundColor = Color.DarkBlue; // 普段は紺色
if (state == GameState.Clear)
backgroundColor = Color.Yellow; // クリアなら黄色
else if (state == GameState.GameOver)
backgroundColor = Color.Red; // ゲームオーバーなら赤
GraphicsDevice.Clear(backgroundColor);
// SpriteBatchで描画するために必要
spriteBatch.Begin();
// ブロックの描画
for (int y = 0; y < blocks.GetLength(0); y++)
{
for (int x = 0; x < blocks.GetLength(1); x++)
{
if (blocks[y, x] == 1)
{
spriteBatch.Draw(textureBlock, new Vector2(BlockWidth * x, BlockHeight * y), Color.White);
}
}
}
// バーの描画
spriteBatch.Draw(textureBar, new Vector2(barPositionX, BarPositionY), Color.White);
// ボールの描画
spriteBatch.Draw(textureBall, ballPosition, Color.White);
// SpriteBatchで描画するために必要
spriteBatch.End();
base.Draw(gameTime);
}
}
}

これで一応、完成といえば完成です!!
改造しよう!
今回作ったプログラムに手を加えて、もっと面白いブロック崩しを作ってみてください!
例えば…
- 徐々にボールの速度が速くなるようにする
- 2回当てないと壊れないブロックや、壊せないブロックなどを追加する
- アイテム・特殊能力を追加する(ボールが複数に増える、バーが伸びる、など)
- 邪魔してくる敵キャラクターを追加する
- ボールが跳ね返る時の効果音を追加する
ボールが複数に増えるという改造は、画面がとても賑やかになるのでオススメです。プログラミングの練習的な意味でも、適度なやりごたえがあって良いと思います。
上記の中でも、徐々にボールの速度が速くなるという要件は、ゲームの面白さのために重要ですが、実はこれがなかなか厄介です。
実際ボールの速度を上げてみればわかるのですが、速度が上がってくると、おかしな動きをし始めます。ブロックやバーをすり抜けたり、ウィンドウの外に飛び出していってしまったりします。まあこれは当然で、もし1フレームにつき30ピクセル移動するとしたら、その間に厚さ20ピクセルのブロックがあったとき、重なるかもしれないし重ならないかもしれないということです。重ならなかった場合にすり抜けが発生します。ではどうしたら良いのかというと、様々な対処法がありますが、最もシンプルな方法としては、移動を細切れに複数回行うようにすれば良いのです。例えば1度に30ピクセル移動するのではなく、3ピクセルずつ10回移動&衝突判定を行えば良いのです。まあ言うほど簡単ではないかもしれませんが、挑戦してみてください。
ボールが高速でも貫通しないように改良した例。※反射神経が追いつかないため、ボールを取り逃してもゲームオーバーにならないようにしています。


0 件のコメント:
コメントを投稿