動きに緩急を付けてワンランク上の見た目にする方法をやります。
EasingおよびTweenとは
このGIF画像では、クリックした場所にぱっちぃが0.5秒かけて移動しています。

まあ、普通ですね。
では、こちらはどうでしょうか?

こちらも、クリックした場所にぱっちぃが0.5秒かけて移動しています。それはさきほどと同じです。
しかし、明らかに見た目の印象が違います。
何が違うのでしょうか?
わかりますか?
上のGIF画像では、ぱっちぃの移動は常に一定の速度なのです。それに対し、下のGIF画像では、動きに緩急が付いています。動き始めは速く、終盤は減速してゆっくりになっています。そのおかげで、少ししっとりとした、オシャレな感じになるのです。
このように動きに緩急を付けることを「Easing(イージング)」や「Tween(トゥイーン)」と呼びます。
最近のアプリやゲームでは日常的に使用される技法です。
普段遊んでいるゲームで、UIなどに注目してみましょう。いまどきのゲームでこの技法を使っていないものはおそらく無いでしょう。
準備
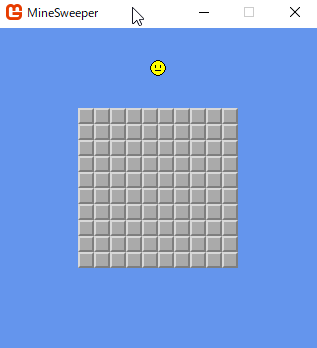
では、MonoGameで作ってみましょう。
今回は、この画像を使うので、右クリックして保存しておいてください。
次に、Visual Studioで、新規Windows MonoGameプロジェクトを作成します。
この記事のサンプルコードでは「Easing」というプロジェクト名にしています。
Content.mgcbを開いて、上の画像 pacchi_32.png を登録してビルドしておいてください。
指定の時間で移動するプログラム
緩急を付ける前に、まずは「指定された場所まで、指定された時間をかけて移動する」プログラムを書きます。
using Microsoft.Xna.Framework;
using Microsoft.Xna.Framework.Graphics;
using Microsoft.Xna.Framework.Input;
namespace Easing
{
public class Game1 : Game
{
// 状態種別
enum State
{
Moving, // 移動中
Stopped, // 停止
}
const int Duration = 30; // 移動にかける時間(フレーム数)
GraphicsDeviceManager graphics;
SpriteBatch spriteBatch;
Texture2D texture; // テクスチャ
MouseState prevMouse; // 1フレーム前のマウスの状態
Vector2 currentPosition = Vector2.Zero; // 現在の位置
Vector2 startPosition; // 移動の開始位置
Vector2 endPosition; // 移動の終了位置
int elapsedTime; // 移動の経過時間
State state = State.Stopped; // 現在の状態
public Game1()
{
graphics = new GraphicsDeviceManager(this);
Content.RootDirectory = "Content";
}
protected override void Initialize()
{
// TODO: Add your initialization logic here
// マウスを表示する
IsMouseVisible = true;
base.Initialize();
}
protected override void LoadContent()
{
// Create a new SpriteBatch, which can be used to draw textures.
spriteBatch = new SpriteBatch(GraphicsDevice);
// TODO: use this.Content to load your game content here
texture = Content.Load<Texture2D>("pacchi_32"); // 画像読み込み
}
protected override void UnloadContent()
{
}
protected override void Update(GameTime gameTime)
{
if (GamePad.GetState(PlayerIndex.One).Buttons.Back == ButtonState.Pressed || Keyboard.GetState().IsKeyDown(Keys.Escape))
Exit();
// TODO: Add your update logic here
MouseState currentMouse = Mouse.GetState();
// マウスが押された?
if (prevMouse.LeftButton == ButtonState.Released && currentMouse.LeftButton == ButtonState.Pressed)
{
// 移動の開始位置を現在の位置とする
startPosition = currentPosition;
// 移動の終了位置をクリックされた場所とする
endPosition = new Vector2(currentMouse.X, currentMouse.Y);
// 経過時間を0にする
elapsedTime = 0;
// 状態をMovingにする
state = State.Moving;
}
// 移動中のときの処理
if (state == State.Moving)
{
// まだ終了時間ではない場合
if (elapsedTime < Duration)
{
// どれくらい時間が経過したのかを0~1で表す
float timeRate = (float)elapsedTime / Duration;
// 開始位置と終了位置の間のどこにいれば良いかをLerp(線形補間)で割り出す
currentPosition = Vector2.Lerp(startPosition, endPosition, timeRate);
}
// 終了時間の場合
else
{
// 終了位置にいく
currentPosition = endPosition;
// 状態をStoppedにする
state = State.Stopped;
}
// 経過時間をインクリメントする
elapsedTime++;
}
// 次のフレームのために、今回のマウスの状態をとっておく
prevMouse = currentMouse;
base.Update(gameTime);
}
protected override void Draw(GameTime gameTime)
{
GraphicsDevice.Clear(Color.CornflowerBlue);
// TODO: Add your drawing code here
spriteBatch.Begin();
// currentPositionに画像を描画する
spriteBatch.Draw(texture, currentPosition + new Vector2(-16, -16), Color.White);
spriteBatch.End();
base.Draw(gameTime);
}
}
}
クリックした場所に、ぱっちぃの画像が移動するようになります。
今回は、
線形補間という技法で移動を行っています。
やたらと難しそうですが、難しいのは名前だけです。
例えば・・・
問題です!!
A君は10秒で20メートル歩くことができます。
5秒では何メートル歩けるでしょう!?
答えは10メートルですね。
当たり前ですね。
これが線形補間です。
まあ、実際はもう少しだけ話が複雑なことが多いですが。
例えば、こんな感じ。
問題です!!
B君の体重はもともと60kgでしたが、その後100日間で70kgに増えてしまいました。
B君の体重が一定の速度で増えていったと仮定すると、60kgのときから25日経過した時点での体重は何kgだったでしょう!?
答えは62.5kgですね。
簡単ですよね。
これが線形補間です。
要するに、一定の速度で変化する何かがあり、その始めと終わりの値がわかっていて、トータルの時間もわかっていれば、途中の値は計算で出せるよね、と。これをカッコつけて線形補間と呼んでいます。
線形補間は、ゲームプログラミング(グラフィック系のプログラミング)では重宝します。重宝しすぎます。
重宝しすぎるので、大抵の環境では、この線形補間を計算してくれる関数が用意されています。
大抵、Lerp(ラープ)という名前です(Linear interpolation:線形補間の略)。
で、今回のプログラムでは
Vector2.Lerp()
というのを使っています。
これは、Vector2型の値に対して線形補間を行うものです。
まあ、ただ単にXとYに対して個別に線形補間してるだけなんですが、自分でやるのも面倒なので、ありがたく使わせてもらいましょう。
Lerp関数の引数は、大抵、
第1引数:開始値
第2引数:終了値
第3引数:経過時間
となっています。
第3引数の経過時間の指定方法は、大抵、0~1での指定となります。
例えば、10秒かけて移動する場合の5秒時点での位置を求めたかったら0.5を指定します。
Easing関数を使って緩急を付ける
では、いよいよ本題です。
動きに緩急を付けます。
まず、次の関数を追加してください。
// 序盤が速く、徐々に減速する
float EaseOutQuart(float t)
{
t -= 1f;
return -1f * (t * t * t * t - 1);
}
そして、Vector2.Lerp()を使って移動させている処理の直前に、1行追加します。
protected override void Update(GameTime gameTime)
{
if (GamePad.GetState(PlayerIndex.One).Buttons.Back == ButtonState.Pressed || Keyboard.GetState().IsKeyDown(Keys.Escape))
Exit();
// TODO: Add your update logic here
MouseState currentMouse = Mouse.GetState();
// マウスが押された?
if (prevMouse.LeftButton == ButtonState.Released && currentMouse.LeftButton == ButtonState.Pressed)
{
// 移動の開始位置を現在の位置とする
startPosition = currentPosition;
// 移動の終了位置をクリックされた場所とする
endPosition = new Vector2(currentMouse.X, currentMouse.Y);
// 経過時間を0にする
elapsedTime = 0;
// 状態をMovingにする
state = State.Moving;
}
// 移動中のときの処理
if (state == State.Moving)
{
// まだ終了時間ではない場合
if (elapsedTime < Duration)
{
// どれくらい時間が経過したのかを0~1で表す
float timeRate = (float)elapsedTime / Duration;
// イージング関数により緩急をつける
timeRate = EaseOutQuart(timeRate);
// 開始位置と終了位置の間のどこにいれば良いかをLerp(線形補間)で割り出す
currentPosition = Vector2.Lerp(startPosition, endPosition, timeRate);
}
// 終了時間の場合
else
{
// 終了位置にいく
currentPosition = endPosition;
// 状態をStoppedにする
state = State.Stopped;
}
// 経過時間をインクリメントする
elapsedTime++;
}
// 次のフレームのために、今回のマウスの状態をとっておく
prevMouse = currentMouse;
base.Update(gameTime);
}
たったのこれだけで、動きに緩急が付きます!
まるで魔法のようですね。
この魔法のような関数を発明したのは、Robert Pennerという人らしく、どうやらFLASHの開発者の方だとか。
上記の EaseOutQuart という関数および、ここから下のコードは、Robert Penner氏の著作物です。
オープンソースであり、MITライセンスおよびBSDライセンスなので、無料で自由に使えますが、使った作品を公開する場合はライセンス表記が必要なので、注意しましょう。
Easing関数
上記のEaseOutQuartという関数は一体何なのでしょうか?
EaseOutQuartは、0~1の範囲の値を受け取り、ちょびっとだけ変更して返却する関数です。
例えば、受け取った値をそのまま返却する関数があったとします。
float Sample(float t)
{
return t;
}
引数をx, 戻り値をyとすると、
y = x となります。
数学的にグラフにするとこうです

これに対して、EaseOutQuart関数の引数をx、戻り値をyとしたときのグラフはこうです

2つのグラフには共通点があります。
xが0のときは、yも0で、
xが1のときは、yも1。
というところです。
違うのは途中経過です。
EaseOutQuartのほうは、序盤、ぐんぐん変化して、徐々に失速し、終盤はほとんど変化しません。
この値の変化が、そのまま、今回のプログラムの緩急の付いた動きに表れているということです。
で、ここからがEasing関数のさらにすごいところなのですが、Easing関数は他にもたくさんの種類があり、関数を取り替えるだけで、簡単に見た目の印象を変えることができるのです。
今度は、少しクセのあるEasing関数を使ってみましょう。
次の関数を追加してください。
// 序盤から速い。最後は一度、目標値を通り越してから、目標値に戻る。
// overshoot : 通り越す量
float EaseOutBack(float t, float overshoot = 1f)
{
float s = 1.70158f * overshoot;
t -= 1f;
return (t * t * ((s + 1f) * t + s) + 1f);
}
で、EaseOutQuart()を使っていた部分を、EaseOutBack()に取り替えます。
// イージング関数により緩急をつける
timeRate = EaseOutBack(timeRate);

勢いがすごくて、目的地を通り過ぎるような動きになりました!
このように、関数を取り替えるだけで、見た目の印象をがらっと変えることができるのがEasing関数のすごいところです。
他にも下記のように大量の関数があります
// 序盤が速く、徐々に減速する
float EaseOutQuad(float t)
{
return -1f * t * (t - 2f);
}
// 序盤は遅く、徐々に加速する
float EaseInQuad(float t)
{
return t * t;
}
// 序盤は遅く、中盤は速くなり、終盤はまた遅くなる
float EaseInOutQuad(float t)
{
t *= 2f;
if (t < 1) return t * t * 0.5f;
t -= 1f;
return (t * (t - 2) - 1) * -0.5f;
}
// 序盤が速く、徐々に減速する
float EaseOutCubic(float t)
{
t -= 1f;
return t * t * t + 1;
}
// 序盤は遅く、徐々に加速する
float EaseInCubic(float t)
{
return t * t * t;
}
// 序盤は遅く、中盤は速くなり、終盤はまた遅くなる
float EaseInOutCubic(float t)
{
t *= 2f;
if (t < 1f) return 0.5f * t * t * t;
t -= 2f;
return (t * t * t + 2f) * 0.5f;
}
// 序盤が速く、徐々に減速する
float EaseOutQuart(float t)
{
t -= 1f;
return -1f * (t * t * t * t - 1);
}
// 序盤は遅く、徐々に加速する
float EaseInQuart(float t)
{
return t * t * t * t;
}
// 序盤は遅く、中盤は速くなり、終盤はまた遅くなる
float EaseInOutQuart(float t)
{
t *= 2f;
if (t < 1) return 0.5f * t * t * t * t;
t -= 2f;
return -0.5f * (t * t * t * t - 2f);
}
// 序盤が速く、徐々に減速する
float EaseOutQuint(float t)
{
t -= 1f;
return t * t * t * t * t + 1f;
}
// 序盤は遅く、徐々に加速する
float EaseInQuint(float t)
{
return t * t * t * t * t;
}
// 序盤は遅く、中盤は速くなり、終盤はまた遅くなる
float EaseInOutQuint(float t)
{
t *= 2f;
if (t < 1f) return 0.5f * t * t * t * t * t;
t -= 2f;
return 0.5f * (t * t * t * t * t + 2f);
}
// 序盤が速く、徐々に減速する
float EaseOutExpo(float t)
{
return (float)(-System.Math.Pow(2, -10 * t) + 1);
}
// 序盤は遅く、徐々に加速する
float EaseInExpo(float t)
{
return (float)(System.Math.Pow(2, 10 * (t - 1)));
}
// 序盤は遅く、中盤は速くなり、終盤はまた遅くなる
float EaseInOutExpo(float t)
{
t *= 2f;
if (t < 1f) return (float)(0.5 * System.Math.Pow(2, 10 * (t - 1)));
t -= 1f;
return (float)(0.5 * (-System.Math.Pow(2, -10 * t) + 2));
}
// 序盤から速い。最後は一度、目標値を通り越してから、目標値に戻る。
// overshoot : 通り越す量
float EaseOutBack(float t, float overshoot = 1f)
{
float s = 1.70158f * overshoot;
t -= 1f;
return (t * t * ((s + 1f) * t + s) + 1f);
}
// 一度、開始値から逆走してから、目標値に向かって一気に動く。後ろにバックしてパワーを溜めてからはじけるようなイメージ。
// overshoot : 開始時にバックする量
float EaseInBack(float t, float overshoot = 1f)
{
float s = 1.70158f * overshoot;
return t * t * ((s + 1f) * t - s);
}
// EaseOutBackとEaseInBackの両方の特徴をあわせ持つ。
// 後ろにバックしてパワーを溜めて、はじけるように移動し、最後は一旦目標値を通り越してから、目標値に戻る。
// overshoot : 開始時にバックする量、および終了時に通り越す量
float EaseInOutBack(float t, float overshoot = 1f)
{
float s = 1.70158f * overshoot;
t *= 2f;
if (t < 1f)
{
s *= (1.525f) * overshoot;
return 0.5f * (t * t * ((s + 1f) * t - s));
}
t -= 2f;
s *= (1.525f * overshoot);
return 0.5f * (t * t * ((s + 1f) * t + s) + 2f);
}
// スーパーボールのように、目標地点でバウンドするような動き。
float EaseOutBounce(float t)
{
if (t < (1f / 2.75f))
{
return 7.5625f * t * t;
}
else if (t < (2f / 2.75f))
{
t -= (1.5f / 2.75f);
return 7.5625f * (t) * t + .75f;
}
else if (t < (2.5f / 2.75))
{
t -= (2.25f / 2.75f);
return 7.5625f * (t) * t + .9375f;
}
else
{
t -= (2.625f / 2.75f);
return 7.5625f * (t) * t + .984375f;
}
}
// バネのようにビヨビヨーンとなる動き。
// overshoot : 振れ幅の大きさ。
// period : 周波数。値が小さいほど小刻みに揺れ、値が大きいほどゆったりと揺れる。
float EaseOutElastic(float t, float overshoot = 1f, float period = 1f)
{
period /= 4f;
float s = period / 4f;
if (overshoot > 1f && t < 0.4f)
overshoot = 1f + (t / 0.4f * (overshoot - 1f));
return (float)(1 + System.Math.Pow(2, -10 * t) * System.Math.Sin((t - s) * (2 * System.Math.PI) / period) * overshoot);
}
本当は、まだいくつかあるのですが、個人的に「これは使わんだろ・・・」というものは除外しました。
これだけ大量にあると、どれを使えば良いのか、途方にくれてしまいます。一個ずつ全て試すわけにもいきません。
そこで、早見表が用意されています。
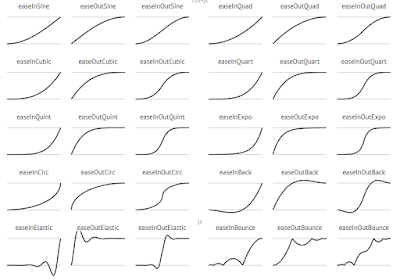
※画像クリックで、詳細ページが開きます
基本的に、EaseIn~は序盤が遅いやつで、
EaseOut~は終盤が遅いやつです。
私がよく使うのは・・・
- EaseOutQuart
- EaseInOutCubic
- EaseOutBack
- EaseInBack
- EaseOutElastic
あたりですかね。
いろいろ、試してみて、お気に入りを見つけてみてください!
移動以外にも使えるぞ
今回のサンプルコードでは、移動に対してEasing関数を使いましたが、移動以外に対してEasing関数を使うことも、よくあります。
例えば、拡大/縮小や回転などに使います。
いろいろ試してみてください!
あ、ちなみに、ゲームエンジンやスマホアプリ開発環境などには、最初からこのEasingを実現する機能が用意されていることが多いので、自作する前にまずは調べましょう。
例えば、Unityだと、DOTweenやLeanTweenなど。
もちろん、MonoGameには無いです・・・
↓Easing関数のライセンスです。Easing関数を利用したものを公開する場合は、どこかに下記のライセンス表記が必要です。
Terms of Use: Easing Functions (Equations)
Open source under the MIT License and the 3-Clause BSD License.
MIT License
Copyright © 2001 Robert Penner
Permission is hereby granted, free of charge, to any person obtaining a copy of this software and associated documentation files (the "Software"), to deal in the Software without restriction, including without limitation the rights to use, copy, modify, merge, publish, distribute, sublicense, and/or sell copies of the Software, and to permit persons to whom the Software is furnished to do so, subject to the following conditions:
The above copyright notice and this permission notice shall be included in all copies or substantial portions of the Software.
THE SOFTWARE IS PROVIDED "AS IS", WITHOUT WARRANTY OF ANY KIND, EXPRESS OR IMPLIED, INCLUDING BUT NOT LIMITED TO THE WARRANTIES OF MERCHANTABILITY, FITNESS FOR A PARTICULAR PURPOSE AND NONINFRINGEMENT. IN NO EVENT SHALL THE AUTHORS OR COPYRIGHT HOLDERS BE LIABLE FOR ANY CLAIM, DAMAGES OR OTHER LIABILITY, WHETHER IN AN ACTION OF CONTRACT, TORT OR OTHERWISE, ARISING FROM, OUT OF OR IN CONNECTION WITH THE SOFTWARE OR THE USE OR OTHER DEALINGS IN THE SOFTWARE.
BSD License
Copyright © 2001 Robert Penner
Redistribution and use in source and binary forms, with or without modification, are permitted provided that the following conditions are met:
Redistributions of source code must retain the above copyright notice, this list of conditions and the following disclaimer.
Redistributions in binary form must reproduce the above copyright notice, this list of conditions and the following disclaimer in the documentation and/or other materials provided with the distribution.
Neither the name of the author nor the names of contributors may be used to endorse or promote products derived from this software without specific prior written permission.
THIS SOFTWARE IS PROVIDED BY THE COPYRIGHT HOLDERS AND CONTRIBUTORS "AS IS" AND ANY EXPRESS OR IMPLIED WARRANTIES, INCLUDING, BUT NOT LIMITED TO, THE IMPLIED WARRANTIES OF MERCHANTABILITY AND FITNESS FOR A PARTICULAR PURPOSE ARE DISCLAIMED. IN NO EVENT SHALL THE COPYRIGHT OWNER OR CONTRIBUTORS BE LIABLE FOR ANY DIRECT, INDIRECT, INCIDENTAL, SPECIAL, EXEMPLARY, OR CONSEQUENTIAL DAMAGES (INCLUDING, BUT NOT LIMITED TO, PROCUREMENT OF SUBSTITUTE GOODS OR SERVICES; LOSS OF USE, DATA, OR PROFITS; OR BUSINESS INTERRUPTION) HOWEVER CAUSED AND ON ANY THEORY OF LIABILITY, WHETHER IN CONTRACT, STRICT LIABILITY, OR TORT (INCLUDING NEGLIGENCE OR OTHERWISE) ARISING IN ANY WAY OUT OF THE USE OF THIS SOFTWARE, EVEN IF ADVISED OF THE POSSIBILITY OF SUCH DAMAGE.